Torta de frango cremosa
This is a proper from-scratch chicken pot pie: tender shredded chicken and sweet vegetables suspended in a thyme-scented cream sauce, all sealed inside a double layer of buttery, flaky pastry. Poaching the chicken in the same broth that later thickens the filling builds deep savory flavor, while a quick roux guarantees a sauce thick enough to slice cleanly. It is the ultimate cold-weather comfort dinner, and every bit as good reheated the next day.
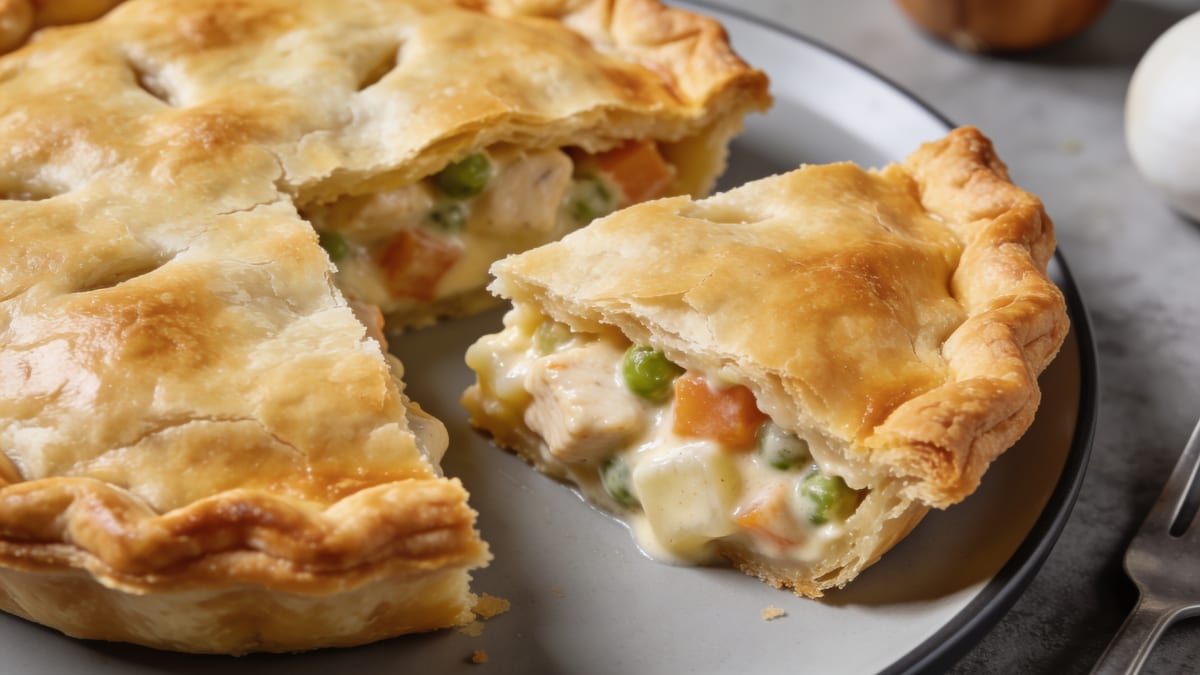
Poach 1½ lb chicken thighs in 2 cups broth for 15 minutes, then shred and reserve the broth; sauté diced onion, carrot, and celery in butter, stir in flour to build a roux and cook it a full minute, then whisk in the reserved broth and 1 cup milk and simmer into a thick, glossy sauce; fold in peas, thyme, and the shredded chicken, season generously, spoon into a pastry-lined 9-inch dish, cover with a second crust, crimp the edges and cut steam vents, brush with egg wash, and bake at 400°F (200°C) for 40-45 minutes until deep golden; cool 15 minutes so the filling sets before slicing.
- Keep the butter and water ice-cold and stop mixing the moment the dough holds together — that is what gives you shatteringly flaky layers.
- Cook the flour with the vegetables for a full minute before adding any liquid so the sauce never tastes pasty.
- Let the baked pie rest 15 minutes; slicing too soon lets the filling flood the plate instead of setting into neat wedges.
Equipment
- 9-inch pie dish
- Large skillet or saucepan
- Rolling pin
- Whisk
- Pastry brush
- Cutting board
Ingredientes
Flaky double crust
- 315 g All-purpose flour
- 6 g Fine sea salt
- 226 g Unsalted butter, cold, cut into cubes
- 120 ml Ice water, add gradually
Creamy chicken filling
- 680 g Boneless, skinless chicken thighs, breast also works
- 480 ml Low-sodium chicken broth
- 85 g Unsalted butter
- 150 g Yellow onion, finely diced
- 150 g Carrots, diced
- 100 g Celery, diced
- Garlic, minced
- 45 g All-purpose flour
- 240 ml Whole milk, or half-and-half
- 150 g Frozen peas, no need to thaw
- 3 g Fresh thyme leaves, or 1 tsp dried
- 6 g Salt, to taste
- 1 g Black pepper, freshly ground
For assembly
- Large egg, beaten, for egg wash
- 15 ml Heavy cream, for egg wash; milk is fine
Modo de preparo
- ETAPA01
Whisk the flour and sea salt in a large bowl. Add the cold cubed butter and rub or cut it in until the mixture looks like coarse crumbs with a few pea-sized pieces still visible. Drizzle in ice water a tablespoon at a time, tossing with a fork, until the dough just holds together when pinched. Divide into two disks, one slightly larger, wrap, and chill at least 30 minutes.
- ETAPA02
Put the chicken thighs and broth in a saucepan, bring to a gentle simmer, and cook until the chicken is cooked through and reaches 165°F (74°C), about 15 minutes. Lift out the chicken, let it cool slightly, then shred into bite-sized pieces. Reserve the poaching broth — it becomes the base of your sauce.
- ETAPA03
Melt the butter in a large skillet over medium heat. Add the onion, carrots, and celery and cook, stirring, until softened and the onion is translucent, about 7 minutes. Stir in the garlic and cook until fragrant, about 1 minute more.
- ETAPA04
Sprinkle the flour over the vegetables and cook, stirring constantly, for a full minute to toast off the raw taste. Slowly whisk in the reserved broth followed by the milk, and simmer until the sauce is thick enough to coat the back of a spoon, 4-6 minutes. Fold in the shredded chicken, peas, and thyme, then season with the salt and pepper. Taste and adjust, then let the filling cool slightly.
- ETAPA05
On a lightly floured surface, roll the larger dough disk into a 12-inch round. Drape it into a 9-inch pie dish, easing it into the corners without stretching, and let the excess overhang the rim.
- ETAPA06
Spoon the cooled filling into the crust and mound it gently. Roll the second disk into an 11-inch round and lay it over the top. Trim the overhang to about ½ inch, fold the edges under, and crimp to seal. Cut 4-5 steam vents in the top and brush all over with the egg beaten with cream.
- ETAPA07
Bake at 400°F (200°C) on the lower-middle rack until the crust is deep golden brown and the filling bubbles at the vents, 40-45 minutes. If the edges brown too fast, shield them with strips of foil.
- ETAPA08
Let the pie rest on a rack for 15 minutes. This lets the sauce thicken and set so it slices into clean wedges rather than running across the plate. Serve warm.
Make ahead
The filling can be made up to 2 days ahead and refrigerated (thin with a splash of broth when reheating, since it thickens as it chills). You can also fully assemble the unbaked pie, wrap it well, and freeze for up to 3 months — bake from frozen at 400°F (200°C), adding about 20-25 minutes to the time.
Storage
Cool completely, then cover and refrigerate for up to 3-4 days. Reheat slices in a 350°F (175°C) oven for 15-20 minutes to re-crisp the crust; the microwave works in a pinch but softens the pastry.
Variations
Puff-pastry top only
Skip the bottom crust and pour the filling straight into the baking dish, then cap it with a sheet of store-bought puff pastry. It bakes faster and lighter, and is a great shortcut on a weeknight.
Gluten-free chicken pot pie
Use a 1:1 gluten-free flour blend for the crust and swap the ⅓ cup thickening flour for the same blend or 3 tbsp cornstarch slurried in cold broth. The filling behaves the same and the crust still crisps up.
Turkey pot pie
Replace the chicken with 3 cups of shredded leftover roast turkey and use turkey stock in place of chicken broth — the classic way to reinvent Thanksgiving leftovers.
Serve with
Nutrition per serving
Nutrition values are estimates based on the metric measurements. Adjust as needed.
Perguntas frequentes
Can I use store-bought crust for chicken pot pie?
Absolutely. Two refrigerated pie crusts turn this into a much faster weeknight chicken pot pie without sacrificing much. Let them sit at room temperature for a few minutes so they unroll without cracking, then fill, top, vent, and bake exactly as written.
Why is my chicken pot pie filling runny?
Usually the sauce was not simmered long enough to thicken, or the filling went in still thin. Cook the roux and liquid until it coats the back of a spoon before assembling, and always let the baked pie rest 15 minutes — the filling sets noticeably as it cools.
What is the best chicken to use?
Boneless thighs stay juicy and are hard to overcook, which is why they are my default. Breast works if you prefer leaner meat, and about 3 cups of shredded rotisserie chicken is a great shortcut — just skip the poaching step and use plain chicken broth for the sauce.
Do I really need a bottom crust?
No. A single top crust (or puff pastry) over the filling gives you a lighter pie and less fuss. A full double crust is the traditional, sturdiest version and travels best, but a top-only chicken pot pie is delicious and quicker.
Can I freeze chicken pot pie?
Yes, and it freezes beautifully. Assemble the pie unbaked, wrap it tightly, and freeze up to 3 months, then bake straight from frozen at 400°F, adding 20-25 minutes. Baked leftovers also freeze well in individual portions.
Cooked this? Rate it.
Real ratings from real cooks. We only show a score once enough of you have weighed in — no fabricated stars.