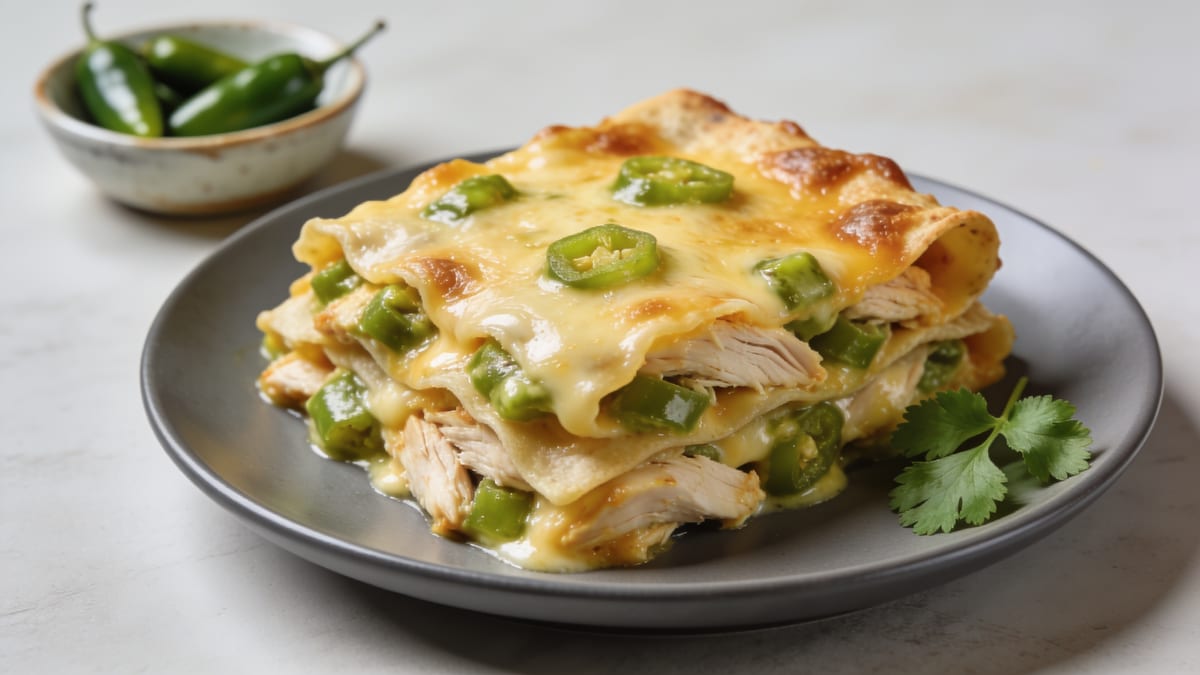
Chicken Enchilada Casserole
Layers of lightly toasted corn tortillas, saucy shredded chicken, black beans, and two melty cheeses deliver all the flavor of rolled enchiladas with none of the rolling. A 10-minute homemade red chile sauce soaks into every layer, while pre-toasting the tortillas keeps the middle tender but never mushy. Baking covered first and uncovered last gives you a bubbling center and a browned, cheesy top.
Preheat the oven to 190°C (375°F) and toast 12 corn tortillas on sheet pans for 5 minutes so they hold up in the sauce. Make a quick red sauce: cook 3 tbsp each oil and flour for a minute, bloom 3 tbsp chili powder with cumin, garlic powder, and oregano, stir in tomato paste, then whisk in 720 ml (3 cups) chicken broth and simmer until it coats a spoon. Stir 1 cup of that sauce plus sour cream, green chiles, black beans, corn, and diced onion into 700 g shredded cooked chicken. In a greased 9x13 dish, layer sauce, tortillas, half the filling, and cheese; repeat, then finish with tortillas, the remaining sauce, and the rest of the cheese. Bake covered for 20 minutes, uncovered for 10-12 more until bubbling and browned, and rest 10 minutes before slicing.
- Toast the tortillas for 5 minutes first — dry, leathery edges absorb sauce without dissolving into mush.
- Stir a full cup of sauce and the sour cream into the chicken so the filling bakes up juicy instead of dry and stringy.
- Bake covered first so the center heats through, then uncover to brown the cheese without drying out the top.
Equipment
- 23x33 cm (9x13-inch) baking dish
- Large saucepan
- Whisk
- Large mixing bowl
- Rimmed sheet pan
- Aluminum foil
- Box grater
Ingredients
Quick red enchilada sauce
- 45 ml neutral oil, canola, avocado, or vegetable
- 25 g all-purpose flour
- 24 g chili powder, mild American-style blend, not pure ground chile
- 4 g ground cumin
- 3 g garlic powder
- 1 g dried oregano, Mexican oregano if you have it
- 33 g tomato paste
- 720 ml low-sodium chicken broth
- 3 g fine salt, plus more to taste
- 5 ml apple cider vinegar, optional; brightens the sauce
Chicken filling
- 700 g cooked shredded chicken, from 1 rotisserie chicken, or 900 g (2 lb) poached thighs and breasts
- 113 g canned diced green chiles, mild, undrained
- 425 g black beans, drained and rinsed
- 150 g frozen corn, no need to thaw
- yellow onion, finely diced
- 120 g sour cream
- 2 g ground cumin
- 1 g freshly ground black pepper
Assembly and garnish
- corn tortillas (6-inch/15 cm), slightly stale ones work especially well
- 170 g Monterey Jack cheese, shred from a block for the best melt
- 170 g sharp cheddar cheese
- 10 g fresh cilantro, for serving
- scallions, thinly sliced, for serving
Method
- STEP01
Set a rack in the middle of the oven and preheat to 190°C (375°F). Grease a 23x33 cm (9x13-inch) baking dish. Shred the chicken into bite-size pieces, dice the onion, shred both cheeses, and drain and rinse the beans.
- STEP02
Spread the tortillas in a single layer across two sheet pans (some overlap is fine) and bake for 4-5 minutes, until they feel dry and slightly leathery at the edges. This quick toast is what keeps the layers distinct instead of dissolving into the sauce. Set aside and leave the oven on.
- STEP03
Heat the oil in a large saucepan over medium heat. Whisk in the flour and cook for 1 minute, then add the chili powder, cumin, garlic powder, and oregano and stir for 30 seconds until fragrant. Stir in the tomato paste, then gradually whisk in the broth until smooth. Simmer, whisking often, for 5-6 minutes until the sauce coats the back of a spoon. Season with the salt and vinegar, tasting and adjusting.
- STEP04
In a large bowl, combine the shredded chicken, green chiles with their liquid, black beans, corn, diced onion, sour cream, cumin, and black pepper. Stir in 240 ml (1 cup) of the red sauce until everything is evenly coated and glossy.
- STEP05
Spread 120 ml (1/2 cup) of sauce over the bottom of the dish. Lay down 4 tortillas, overlapping and tearing them to cover the surface. Top with half the filling, a third of the cheese, and a drizzle of sauce. Repeat with 4 more tortillas, the remaining filling, another third of the cheese, and more sauce. Finish with the last 4 tortillas, pour the remaining sauce over the top so every edge is coated, and scatter on the rest of the cheese.
- STEP06
Cover the dish with foil greased on the underside (so it does not stick to the cheese) and bake for 20 minutes to heat the center through.
- STEP07
Remove the foil and bake for another 10-12 minutes, until the sauce bubbles at the edges and the cheese is melted with browned spots.
- STEP08
Let the casserole rest for 10 minutes so the layers set and slices come out clean. Scatter with cilantro and scallions and serve straight from the dish.
Make ahead
Assemble the whole casserole (unbaked) up to 24 hours ahead, cover, and refrigerate; bake straight from the fridge, adding 10-15 minutes to the covered bake time. The red sauce keeps refrigerated for 5 days or frozen for 3 months. You can also freeze the fully assembled, unbaked casserole tightly wrapped for up to 3 months — thaw overnight in the fridge before baking as written.
Storage
Cool completely, then refrigerate in an airtight container (or cover the dish tightly) for up to 4 days. Reheat individual slices in the microwave for 90 seconds, or reheat the covered dish at 180°C (350°F) for about 20 minutes. Baked leftovers also freeze well in portions for up to 3 months; thaw overnight in the fridge before reheating.
Variations
Salsa verde version
Swap the red sauce for 720 ml (3 cups) of green enchilada sauce or salsa verde, use Monterey Jack plus pepper Jack for the cheese, and stir a handful of chopped cilantro into the filling. The result is tangier and a touch brighter than the red-sauce original.
Gluten-free
The tortillas are already corn, so just fix the sauce: skip the flour roux and instead whisk 2 tbsp cornstarch (or 3 tbsp masa harina) into the cold broth before adding it to the bloomed spices, then simmer until thickened. Double-check that your chili powder and broth are certified gluten-free.
Vegetarian black bean and sweet potato
Replace the chicken with a second can of black beans plus 300 g (about 2 cups) of roasted, cubed sweet potato, and use vegetable broth in the sauce. Bump the cumin to 2 tsp in the filling so it stays deeply savory.
Serve with
Nutrition per serving
Nutrition values are estimates based on the metric measurements. Adjust as needed.
Frequently asked
Can I make chicken enchilada casserole ahead of time?
Yes — this is one of the best make-ahead dinners there is. Assemble the chicken enchilada casserole up to a day ahead, cover, and refrigerate unbaked, then add 10-15 minutes to the covered bake time. It also freezes beautifully, either unbaked (tightly wrapped, up to 3 months, thawed overnight before baking) or in baked portions for quick lunches.
How do I keep the tortillas from getting soggy?
Three things: toast the tortillas for 5 minutes before layering so their surface is dry and sturdy, resist the urge to flood each layer with extra sauce, and let the finished casserole rest a full 10 minutes before cutting. Skipping the toast is the single biggest cause of a mushy middle.
Can I use flour tortillas instead of corn?
You can, but expect a softer, more doughy texture — flour tortillas absorb sauce quickly and lose their structure. Corn tortillas keep distinct layers and taste more traditional. If flour is all you have, use large ones, build only two tortilla layers, and reduce the sauce between layers slightly.
What kind of chicken works best in a chicken enchilada casserole?
Any juicy cooked chicken you can shred: a rotisserie bird is fastest, while poached boneless thighs stay especially moist. Leftover roast chicken or turkey works too. You want about 700 g (5 cups) shredded. Avoid dry pre-grilled strips — they turn chewy after 30 minutes in the oven.
Can I use store-bought enchilada sauce instead of homemade?
Absolutely. You need about 720 ml (3 cups) total, which is two 15-oz cans of red enchilada sauce. That said, the homemade version takes about 10 minutes, uses pantry spices, and tastes noticeably fresher, so try it at least once.
Cooked this? Rate it.
Real ratings from real cooks. We only show a score once enough of you have weighed in — no fabricated stars.